Getting Started with Microsoft365DSC
In this article, we will guide you through all the steps involved in getting up and running with Microsoft365DSC. For the purpose of this article, I created a brand new Windows Server 2025 virtual machine and this is the environment I will be using throughout this blog post. Please note that we will also be using Windows PowerShell 5.1 for all steps described below. It is important to note that at the time of writing this article, the latest Microsoft365DSC version was 1.24.1127.1. Also, while it is possible for you to export the configuration of an existing tenant using administrator credentials, for the purpose of this article, we will use the recommended authentication approach which is to use a Service Principal to authenticate with a certificate to secure the connection.
Step 1 - Install the Core Microsoft365DSC Module⚓
Open a new Windows PowerShell (version 5.1) windows as an administrator.
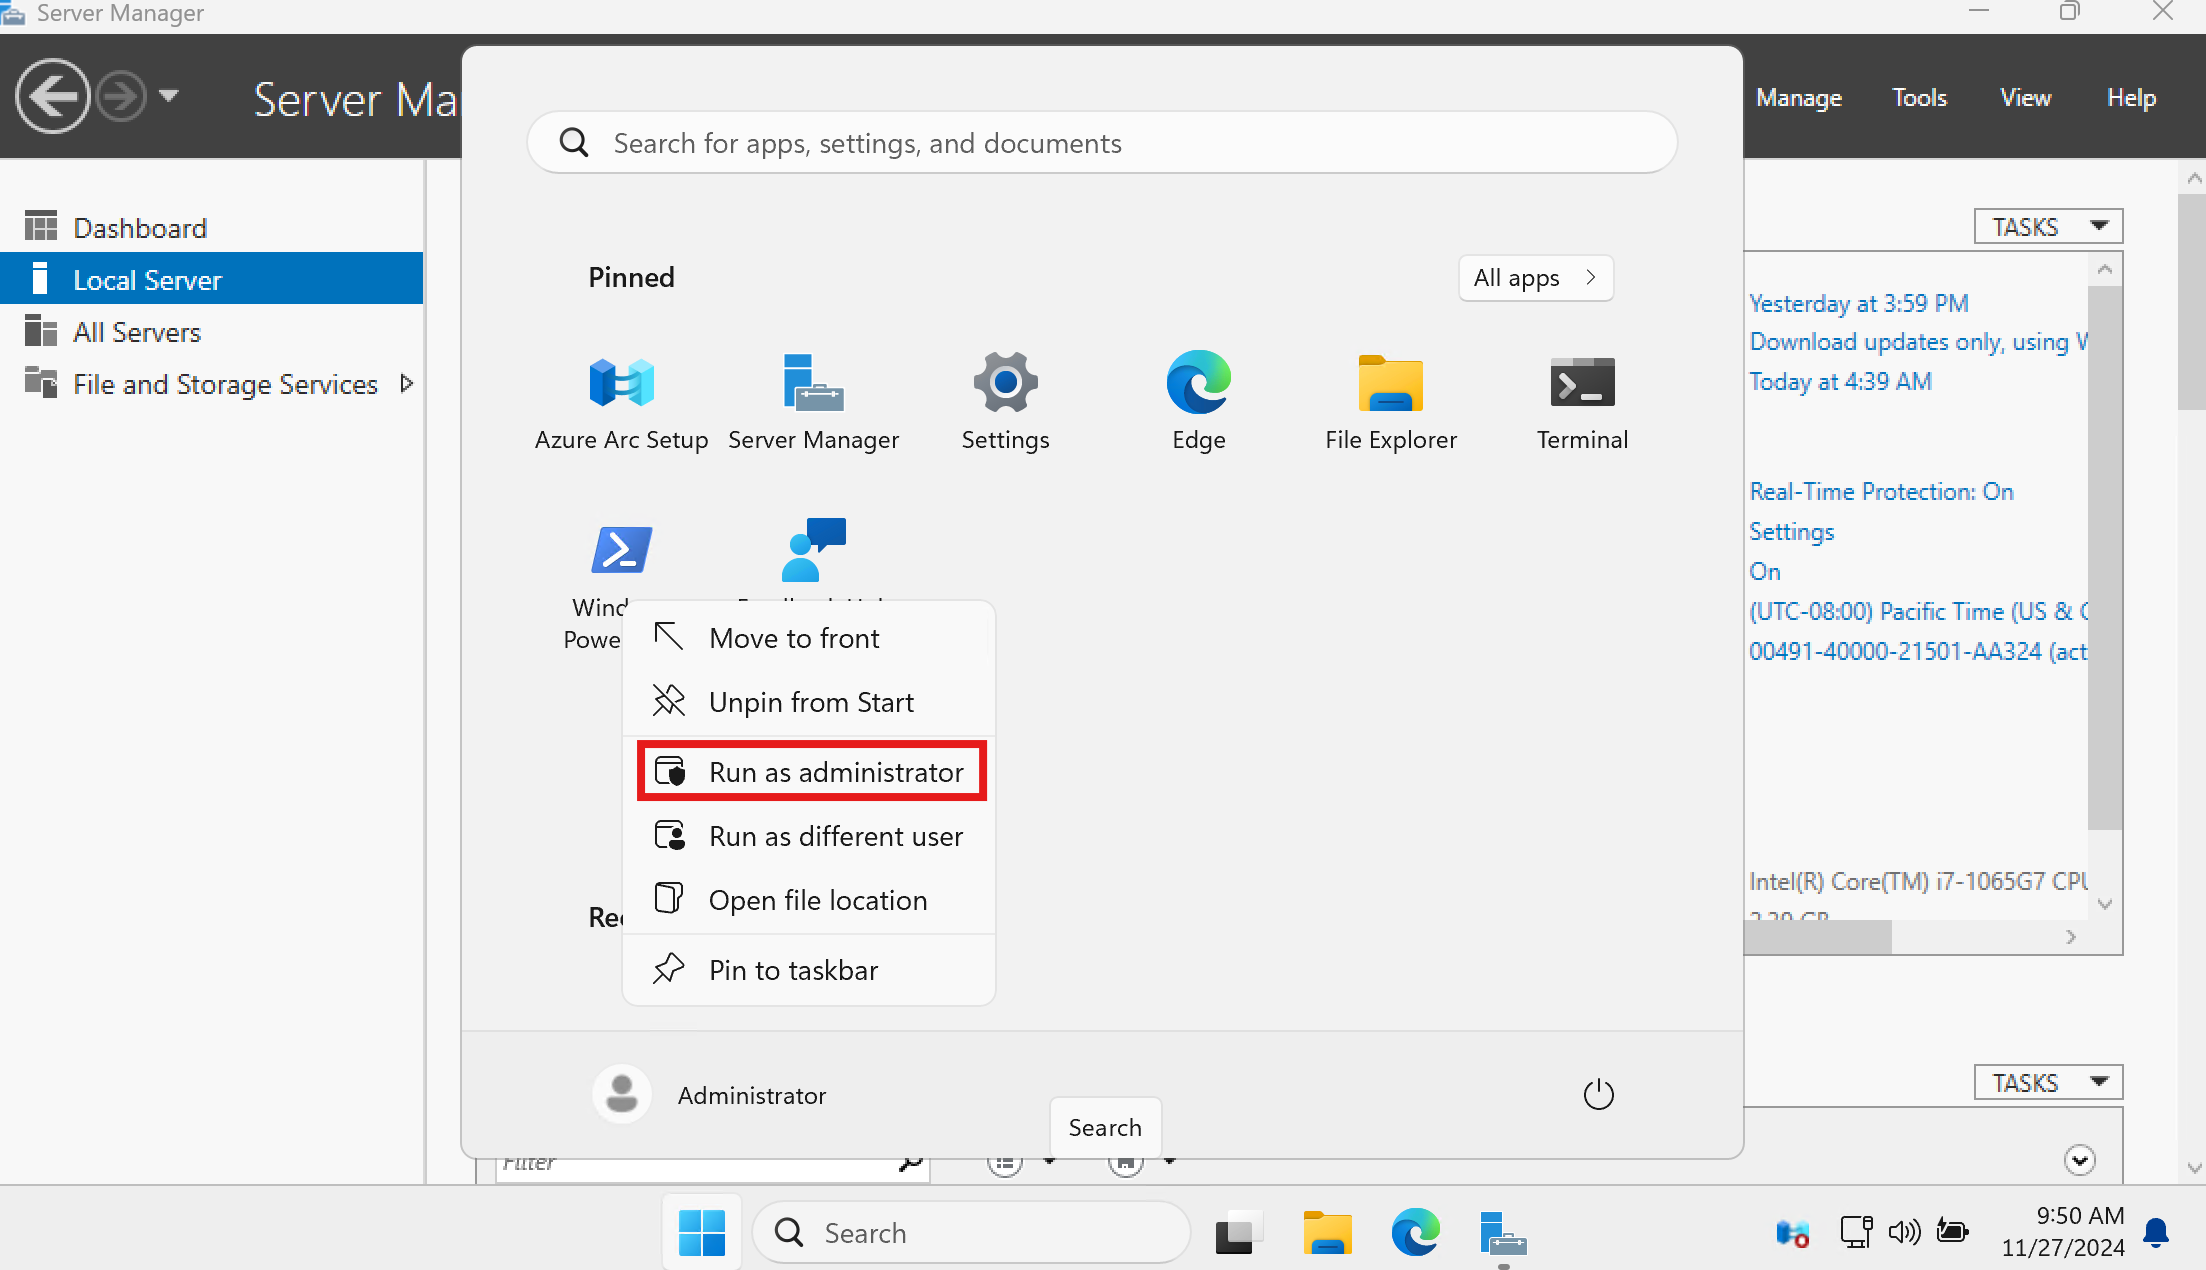
Run the following line of PowerShell code. This will pull the Microsoft365DSC module from the PowerShell Gallery and install it on the machine under the path c:\Program Files\WindowsPowerShell\Modules\Microsoft365DSC\
Install-Module Microsoft365DSC -Force
If prompted to install the latest version of the nuget provider, type in Y.

Step 2- Update Dependencies⚓
Microsoft365DSC depends on about a dozen different other modules (e.g., the Exchange Online Management Shell, the Teams PowerShell Moduel, the Graph PowerShell SDK, etc.). The previous step only installed the core Microsoft365DSC PowerShell module, but di not install any of its dependencies, which are required for the module to run properly. The next step of the installation consists of downloading and installing all of these dependencies. If you are curious to understand what all these dependencies are, you can refer to the Microsoft365DSC Dependency Manifest file. In order to download and install all these dependencies, simply run the following PowerShell cmdlet.
Update-M365DSCModule
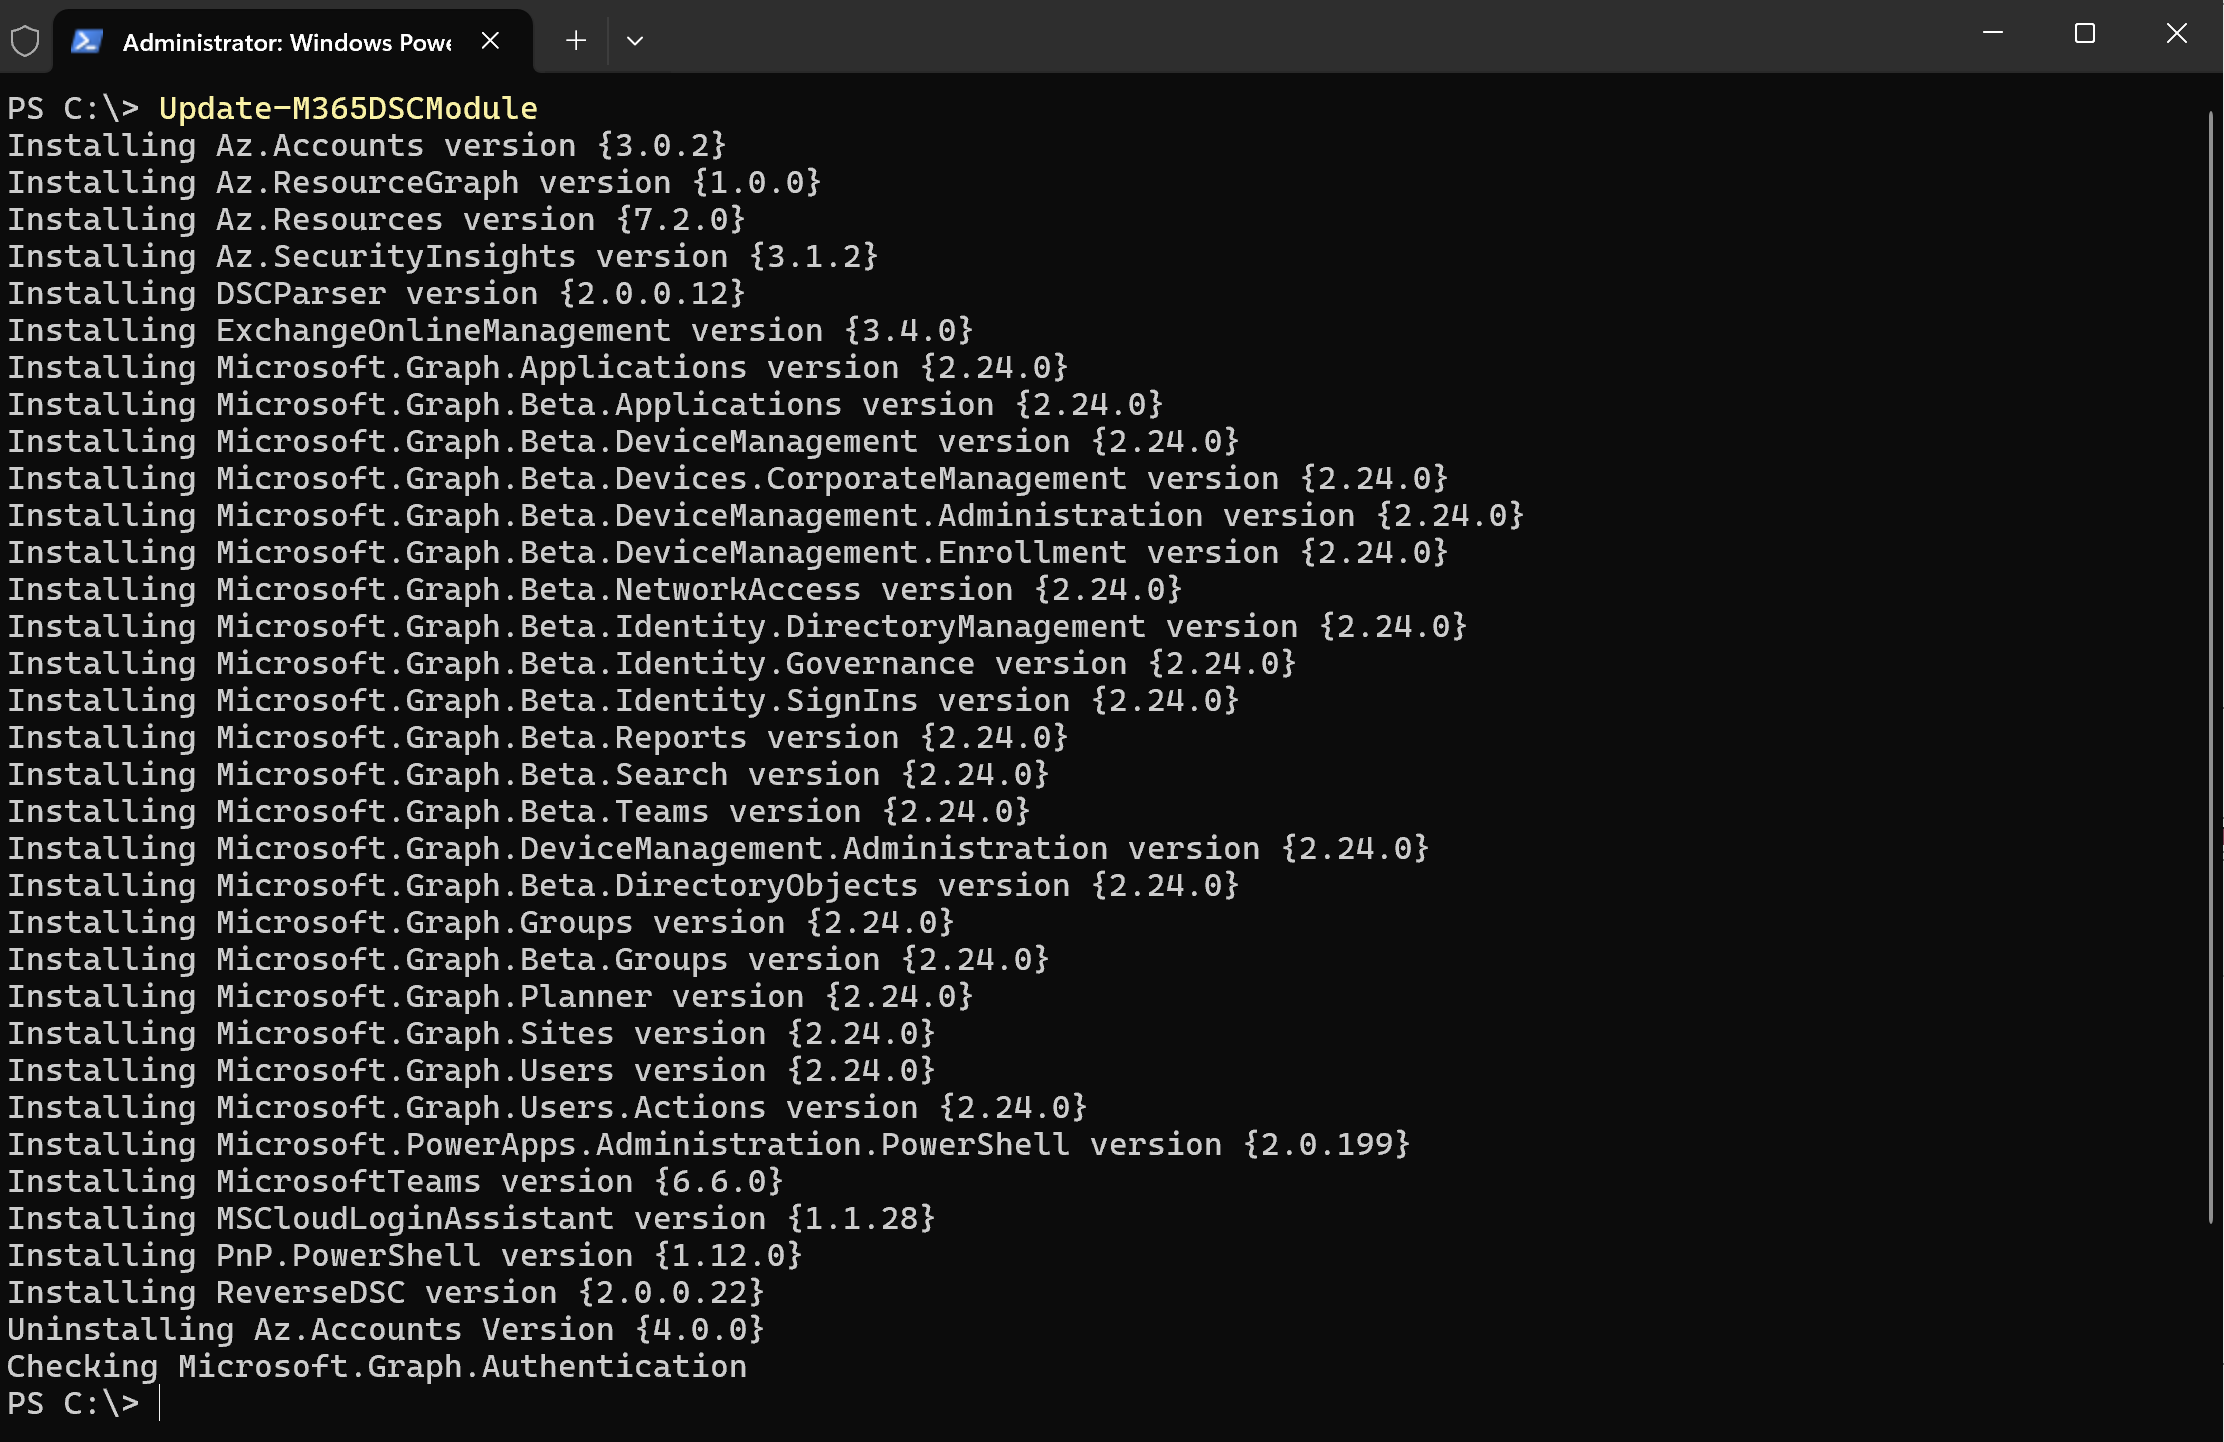
Note: Running this command will automatically download all the dependencies from the PowerShell Gallery and install them under C:\Program Files\WindowsPowerShell\Modules\.
Step 3 - Configure the Agent & Generate the Certificate⚓
The next thing we need to do is generate a certificate which will serve a dual purpose. On one hand, it will secure our authentication process with our service principal, and on the other hand it will encrypt our compiled DSC configuration file to ensure we don't expose any plaintext passwords or secrets. As part of the Microsoft365DSc module, we provide a single cmdlets which allows you to generate the certificate and automatically configure the Local Configuration Manager (LCM) service so that it can use it to decrypt our configuration files. To initiate the process, run the following PowerShell command:
Set-M365DSCAgentCertificateConfiguration -KeepCertificate -GeneratePFX -Password '<choose a password>'

As stated by the output, this will go and generate both a public .cer and a private .pfx certificate file under the listed path. I strongly recommend you copy those somewhere safe since files in the temps folder will eventually get purged. In my case, I will be copying these under C:\DSC.

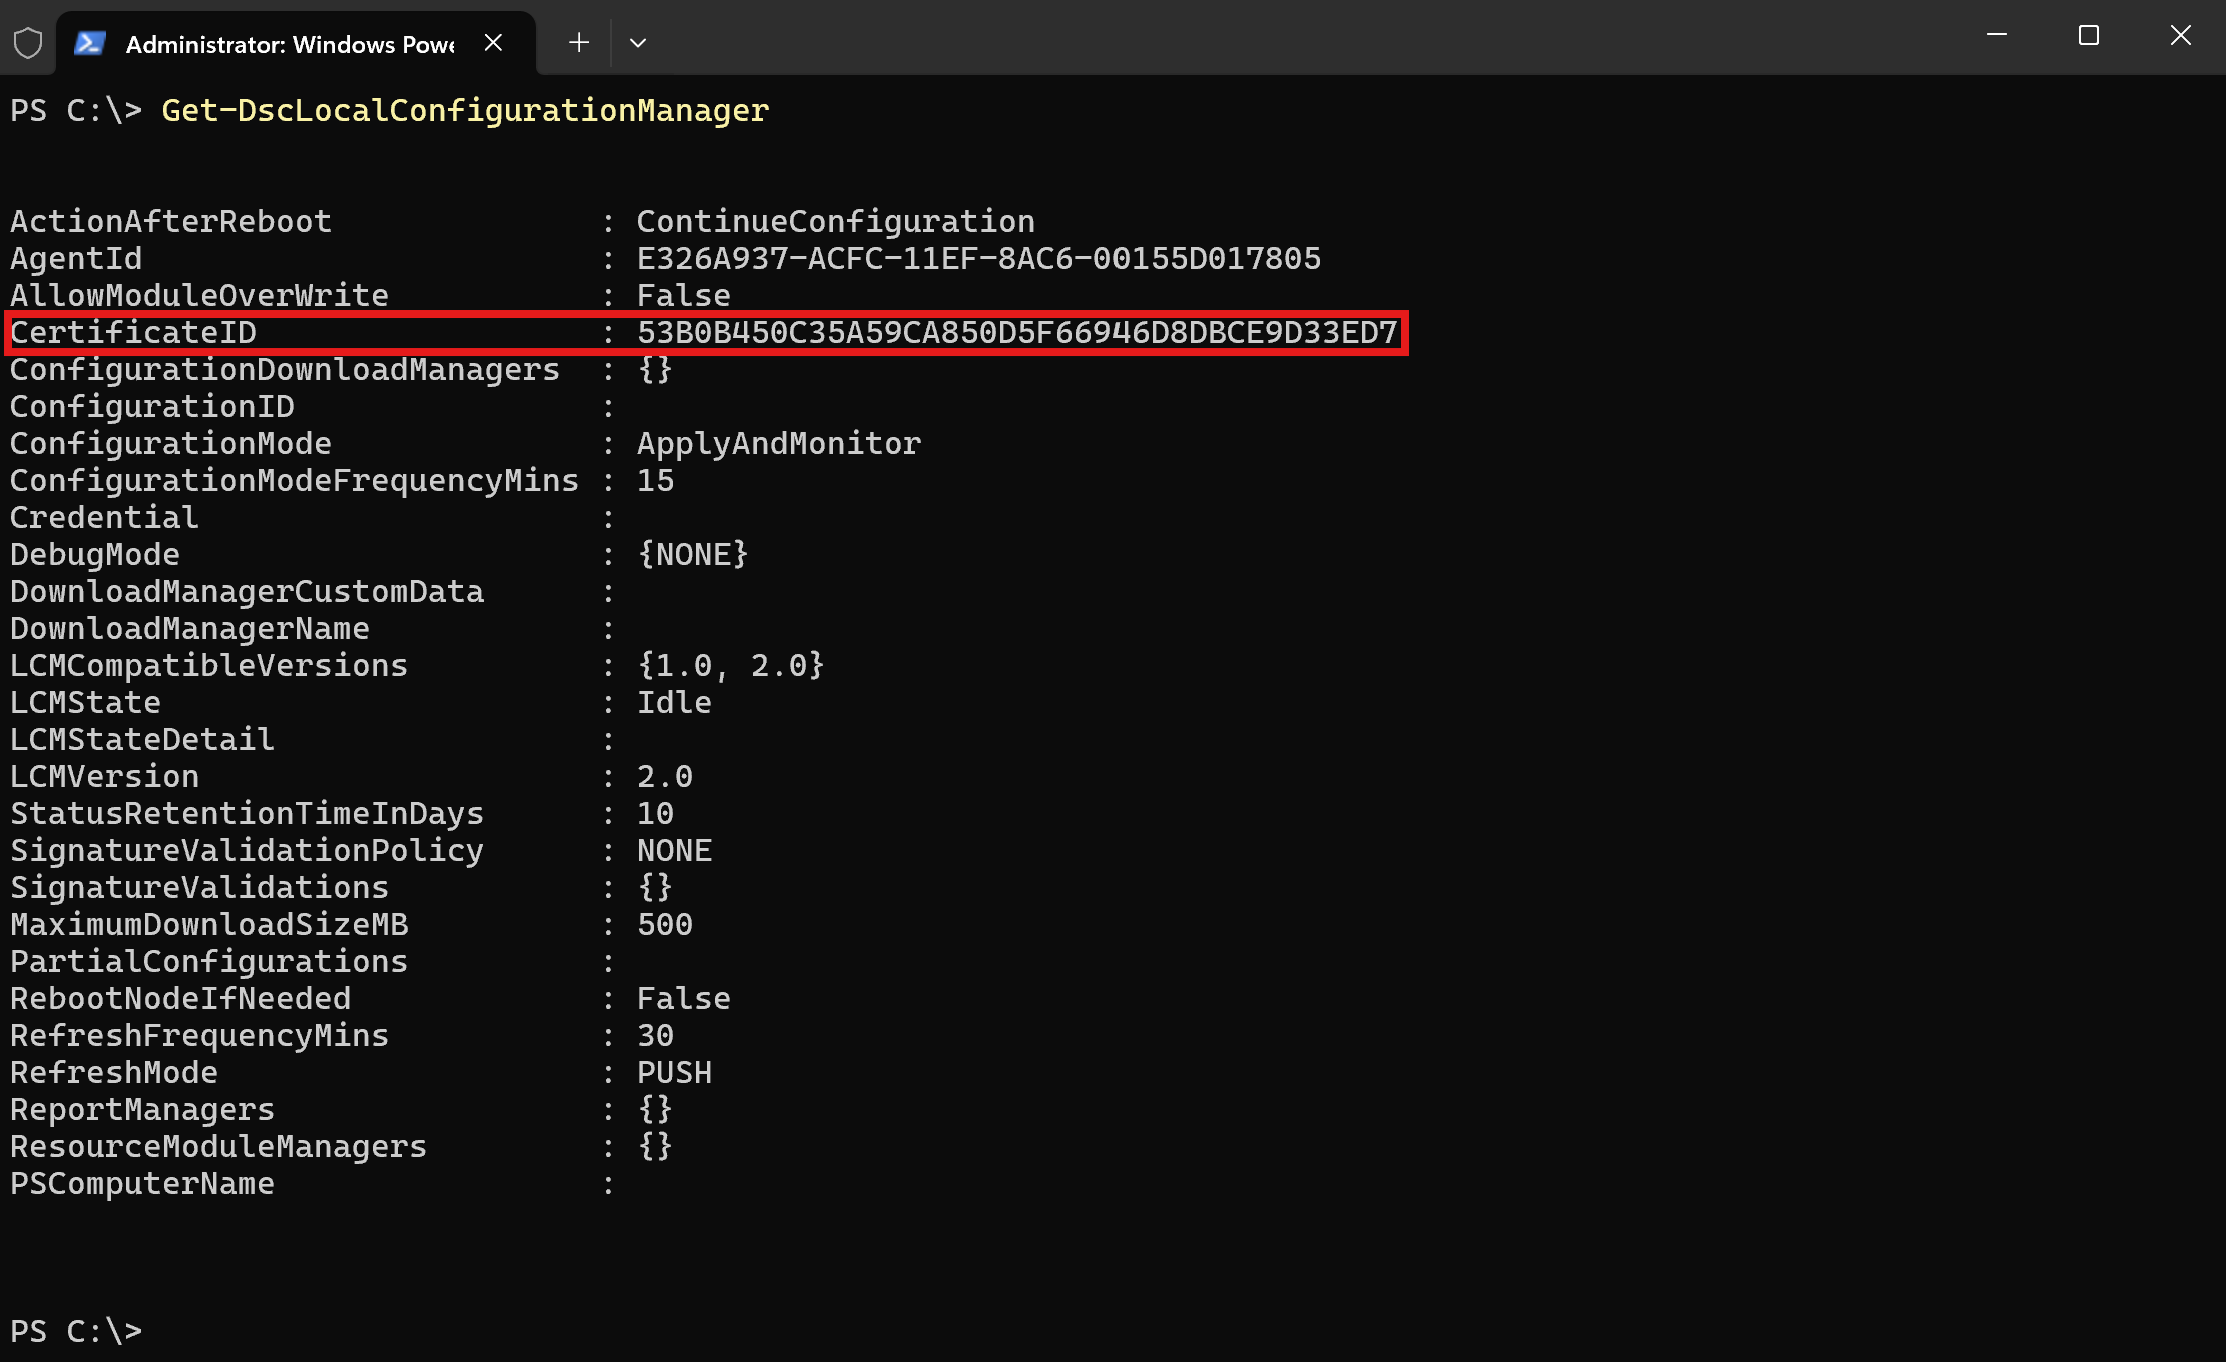
As stated previously, on top of generating the certificate files, the cmdlet also configured your LCM service to use the generated certificate to decrypt configurations. To confirm that the LCM service is properly configured to use the new certificate, you can run the following PowerShell cmdlet and ensure that the CertificateID property reflects the thumbprint of the new certificate.
Get-DSCLocalConfigurationManager
Step 4 - Install the Certificate on the Machine⚓
Once you've confirmed that the LCM is properly configured, the next step is to install the certificate's private key on the machine where you will be running Microsoft365DSC from. To install the certificate in this location, simply double click on the .pfx file and select the Current User as the store location.
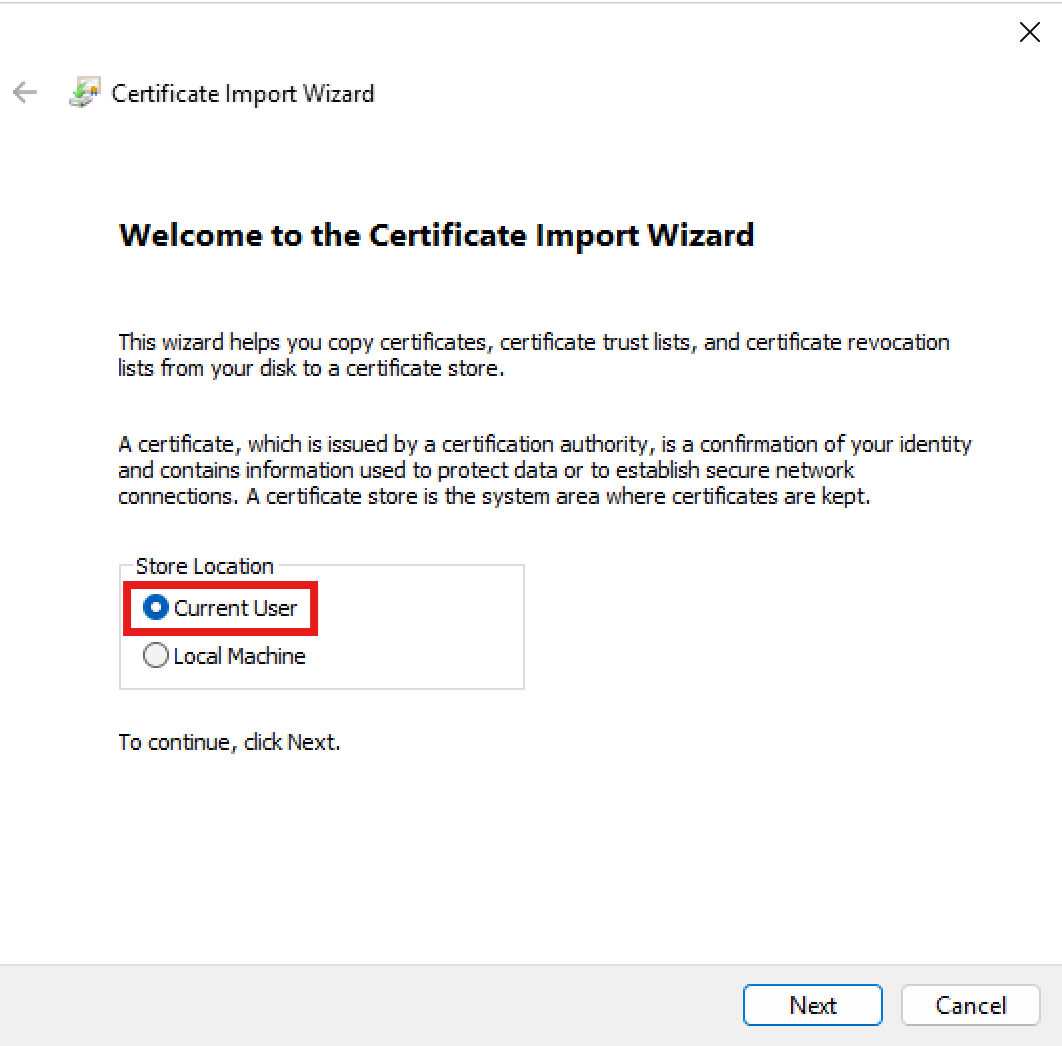
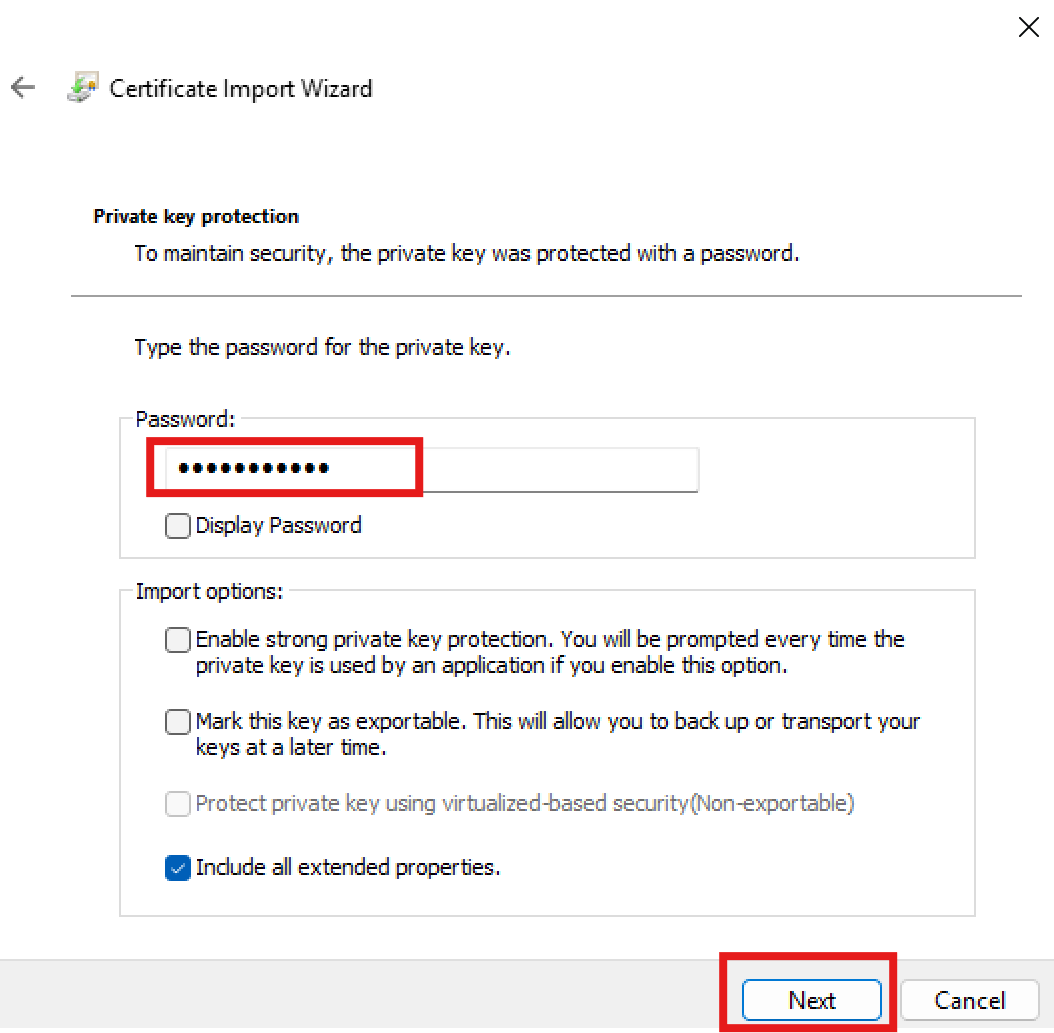
Click the Next button twice, and when prompted to provide the password, type in the password you chosse at step 3 above, when you generated the certificate and its private key. Once the password is entered, leave all the other settings as default and click Next again.
Click Next on the following screen, leaving the default value to "Automatically select the certificate store based on the type of certificate". Then click Finish on the last screen.
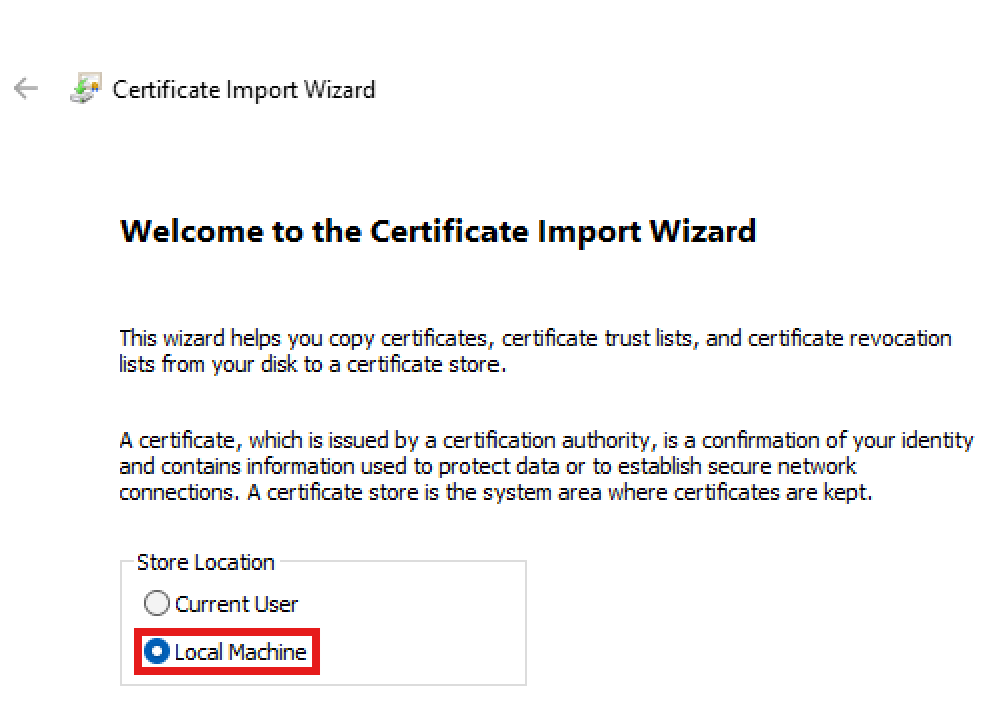
Note:When running DSC via the LCM (e.g., with Start-DSCConfiguration or Test-DSCConfiguration) you will also need to put the certificate in the Local Computer store.
Step 5 - Create a Service Principal⚓
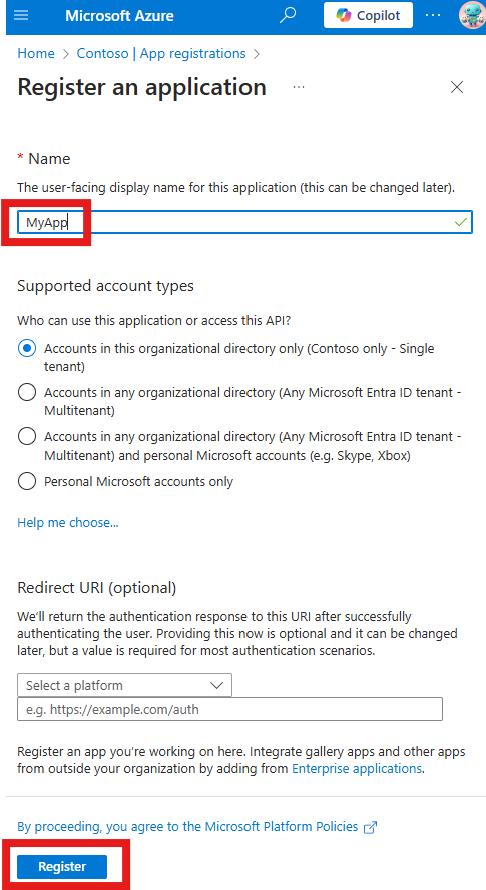
As mentionned at the beginning of this article, we will be authenticating to our tenants using a service principal (SPN). In order to create such an SPN, start by navigating to: Azure App Registration Portal for your tenant. In the to bar, click on New registration.

Provide a name for your new app, leave all the default settings selected and click on Register at the bottom.
On the next screen, take note of the Application (client) ID value for your newly created app. This value is refered to as the ApplicationId property in the context of Microsoft365DSC. In the left navigation, click on the Certificates & secrets link. From there, click on the Certificates (0) header, and then on the Upload certificate button. When prompted, select the public certificate .cer file that was generated at Step 3 above and upload it.
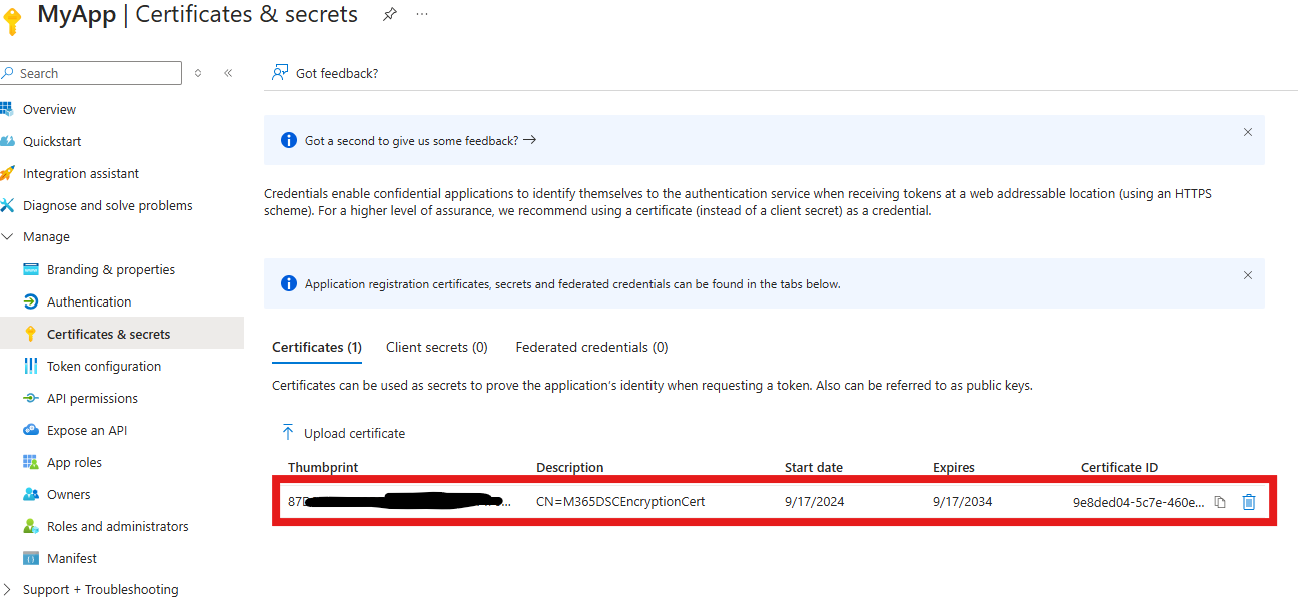
Once the certificate has been successfully uploaded, make sure to copy the Thumbprint value (not the Certificate ID). You will need to keep this value handy as this is refered to as the CertificateThumbprint property in the context of Microsoft365DSC. The last piece of information you need to be able to authenticate t your tenant via your Service Principal, is the Tenant Id. Now, don't let the name of this property fool you, what we actually need is the domain name of the tenant in the form of *.onmicrosoft.com and not the actual tenant's GUID. To find this informatiom, you can navigate to the root of you Entra ID portal, and take a not of the Primary domain value.
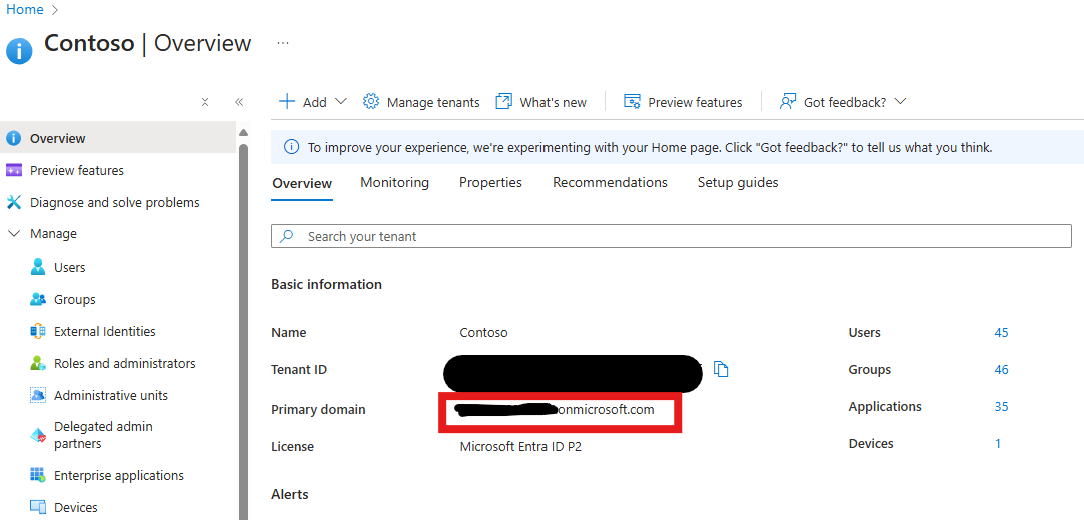
In the context of Microsoft365DSC, this value is known as the TenantId property.
Step 6 - Grant Permission to the Service Principal⚓
By default, our service principal only has access to read the current user's profile. In order for us to be able to either take a snapshot, monitor or make changes to a configuration setting via DSC, we need to grant it the appropriate API permissions. For the purpose of this article, we will focus on the Entra ID Conditional Access Policies. To learn more about the required permissions for all other DSc resources, please refer to the official website at https://Microsoft365DSC.com. We can determine what the required permissions for any given DSC resource are by looking at its associated settings.json file. For example, in the case of the AADConditionalAccessPolicy resource, which is the resource associated with Entra ID Conditional Access Policies, the setting file can be found at https://github.com/microsoft/Microsoft365DSC/blob/Dev/Modules/Microsoft365DSC/DSCResources/MSFT_AADConditionalAccessPolicy/settings.json.
In the case of DSC, we are only interested in the application permissions and can disregard the delegated permissions since the solution only deals with app-only permissions in the context of a Service Principal. By looking at the file, we see that we are listing both the permissions for the read and update scenarios.
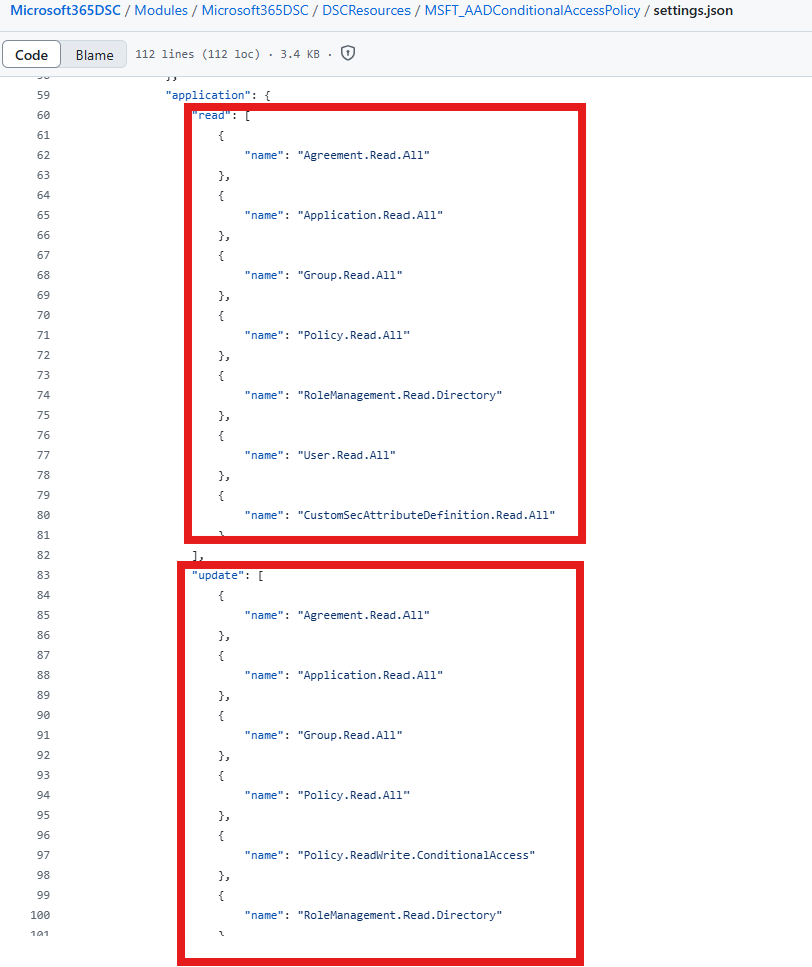
The read scenario represents the case where all you are trying to achieve with your Service Principal is either to export (take a snapshot) of instance of the resource, in occurence a snapshot of all conditional access policies in the tenant, or where you are trying to monitor them for configuration drifts. The update scenario on the other hand is for when you are trying to set the configuration settings, either via an initial deployment of a config, via approved configuration changes or when automatically trying to remediate to detected configuration drifts. It is important to note that the update permissions are a superset of the read permissions and that be granting those to you Service Principal, you are also explicitely allowing it to read the settings. In our case, we will go ahead and grant our app registration all the required permissions for the update scenario. Note:: In addition to these permissions, each Service Principal trying to authenticate via Microsoft365DSC will need to Directory.Read.All permissions in order to ensure the provided tenant Id is the primary domain.
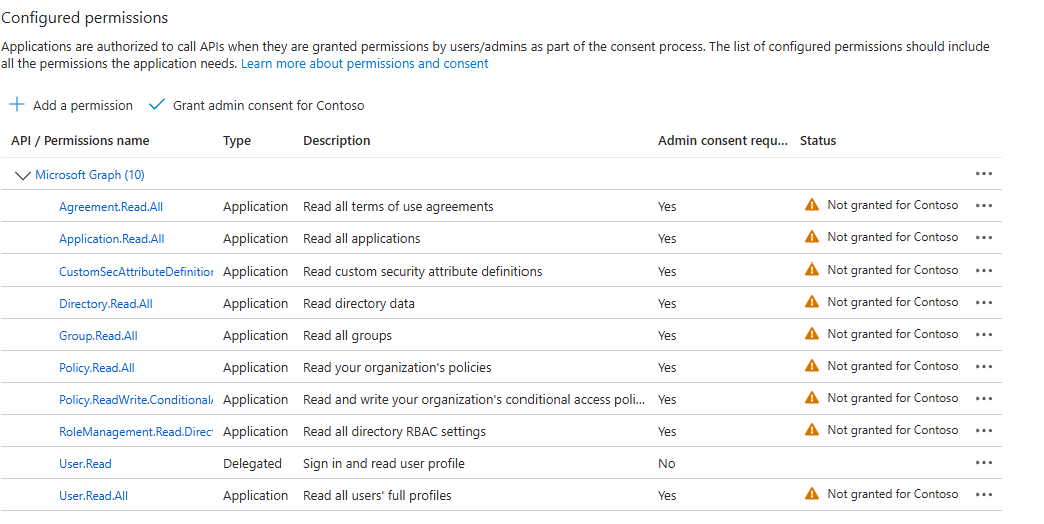
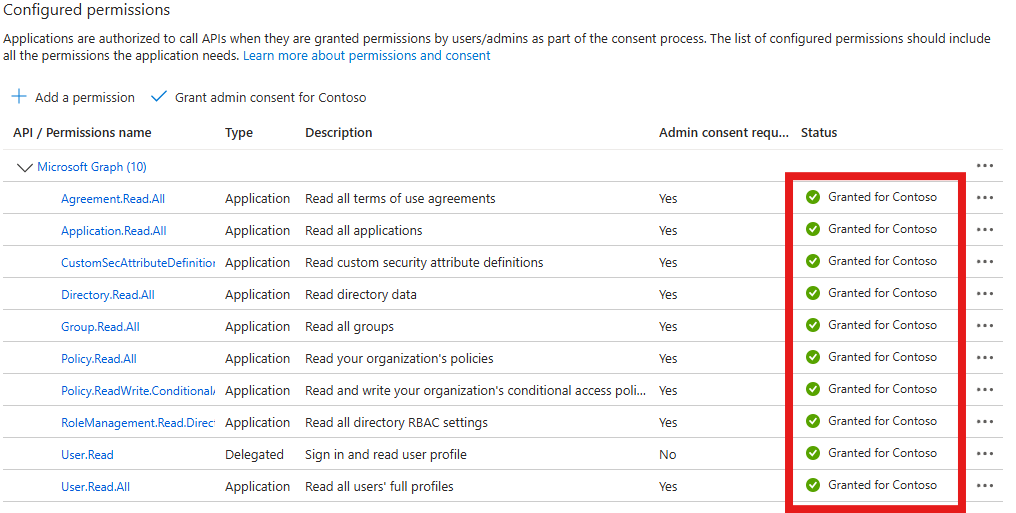
By default, all assigned API permissions are not granted consent at the organization level and therefore cannot be used by your service principal. You will need to grant consent to these permissions on behalf of your organization by clicking on the Grant admin consent for Contoso button and accepting the prompt.
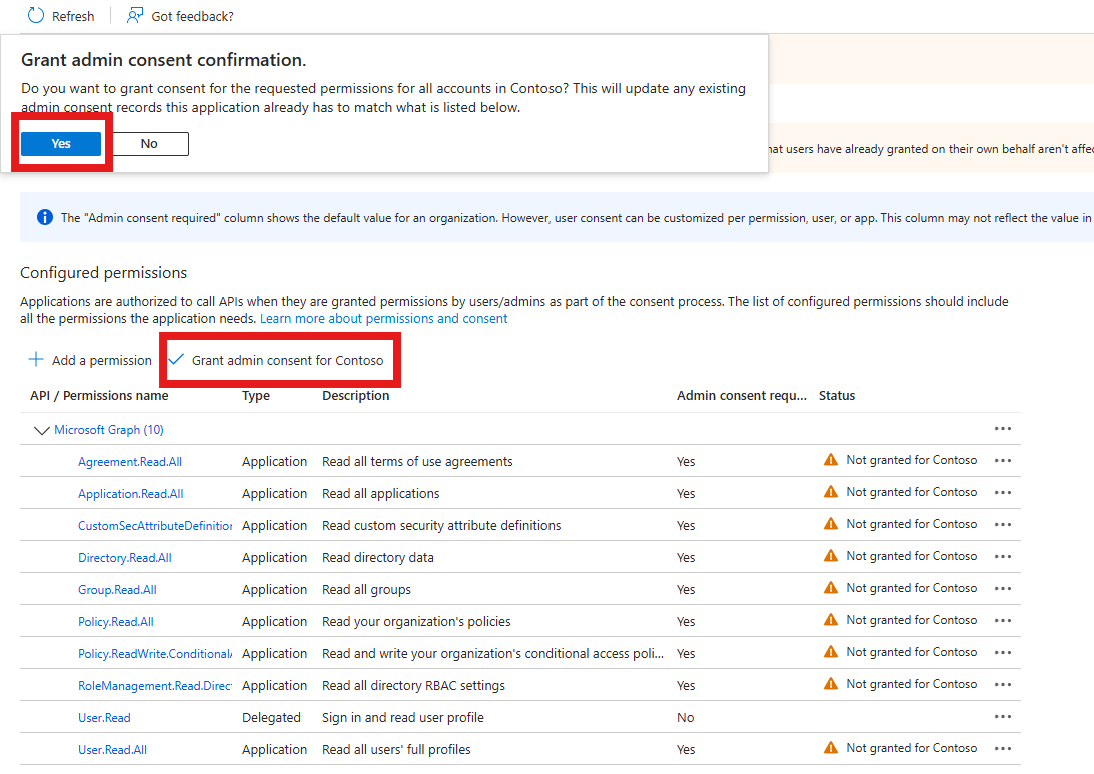
Once the consent has been successfully granted, you should see the warning icons updated to reflect green checkmarks instead.
Step 7 - Take a Snapshot⚓
We are finally ready to start and take a snapshot of our tenant. Make sure you open a new PowerShell consol running as admin and type in the following command, making sure to replace the ApplicationId, TenantId and CertificateThumbprint parameters by the values you noted in Step 5 above.
Export-M365DSCConfiguration -ApplicationId '<ApplicationId>' -TenantId '<TenantId>' -CertificateThumbprint '<CertificateThumbprint>' -Components @('AADConditionalAccessPolicy')
Once the execution completes, make sure you provide a path to store the resulting files. If the provided path doesn't exist, Microsoft365DSC will create it by default and store the exported files at this location.
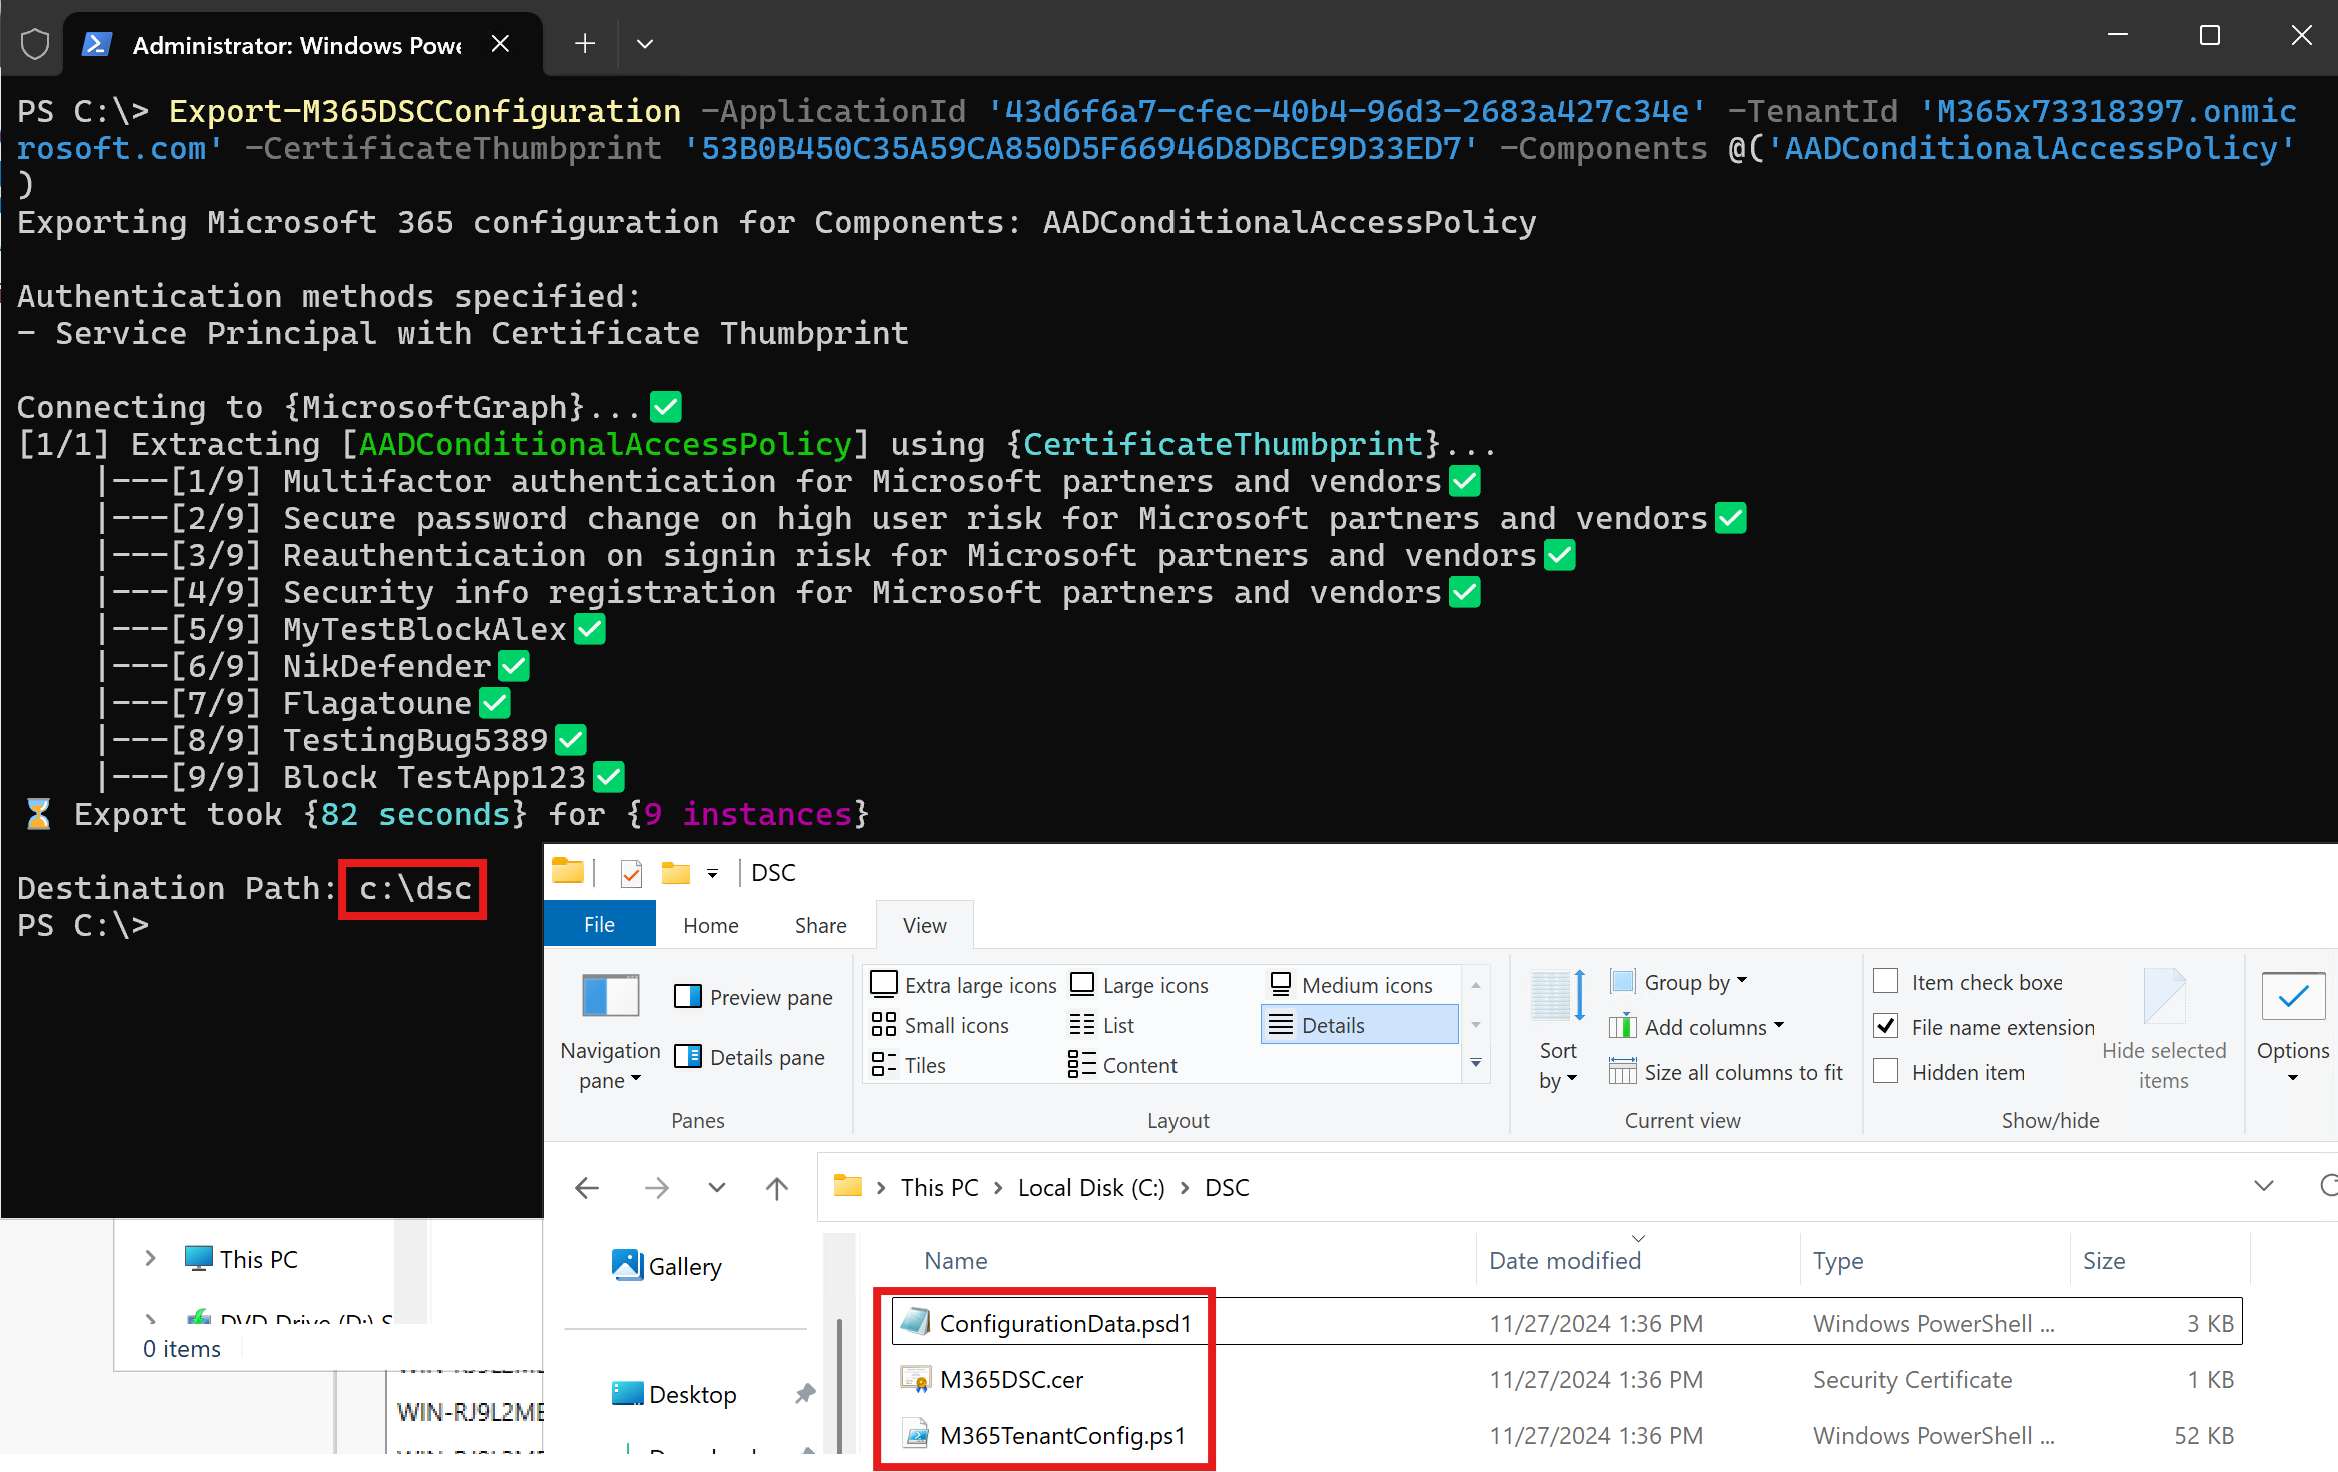
The export process will generate 3 files. The .ps1 file is known as the configuration file contains the exported configuration content (info about the conditional access policies on your tenant). The .psd1 file is known as the Configuration Data file and contains specific information about the tenant where the configuration was exported from (e.g., the application id used, the tenant id and the certificat thumbprint). The 3rd file is a copy of the public certificazte (.cer) file that is associated with your Local Configuration Manager service.
Step 8 - Deploy Configuration Changes⚓
The next thing we will do is deploy a new Conditional Access Policy using DSC. To do so, I will go ahead and modify the M365TenantConfig.ps1 file I extracted at Step 7 above and replace its entire content by the following lines:
param (
)

Configuration M365TenantConfig
{
    param (
    )

    $OrganizationName = $ConfigurationData.NonNodeData.OrganizationName

    Import-DscResource -ModuleName 'Microsoft365DSC' -ModuleVersion '1.24.1127.1'

    Node localhost
    {
        AADConditionalAccessPolicy "AADConditionalAccessPolicy-BlogPost"
        {
            ApplicationEnforcedRestrictionsIsEnabled = $False;
            ApplicationId                            = $ConfigurationData.NonNodeData.ApplicationId;
            AuthenticationContexts                   = @();
            BuiltInControls                          = @("mfa");
            CertificateThumbprint                    = $ConfigurationData.NonNodeData.CertificateThumbprint;
            ClientAppTypes                           = @("all");
            CloudAppSecurityIsEnabled                = $False;
            CloudAppSecurityType                     = "";
            CustomAuthenticationFactors              = @();
            DeviceFilterRule                         = "";
            DisplayName                              = "Blog Demo CAP";
            Ensure                                   = "Present";
            ExcludeApplications                      = @();
            ExcludeExternalTenantsMembers            = @();
            ExcludeExternalTenantsMembershipKind     = "";
            ExcludeGroups                            = @();
            ExcludeLocations                         = @();
            ExcludePlatforms                         = @();
            ExcludeRoles                             = @("Directory Synchronization Accounts");
            ExcludeUsers                             = @("admin@$($OrganizationName)");
            GrantControlOperator                     = "OR";
            IncludeApplications                      = @("All");
            IncludeExternalTenantsMembers            = @();
            IncludeExternalTenantsMembershipKind     = "";
            IncludeGroups                            = @();
            IncludeLocations                         = @();
            IncludePlatforms                         = @();
            IncludeRoles                             = @();
            IncludeUserActions                       = @();
            IncludeUsers                             = @("All");
            PersistentBrowserIsEnabled               = $False;
            PersistentBrowserMode                    = "";
            SignInFrequencyIsEnabled                 = $False;
            SignInFrequencyType                      = "";
            SignInRiskLevels                         = @();
            State                                    = "enabledForReportingButNotEnforced";
            TenantId                                 = $OrganizationName;
            TransferMethods                          = "";
            UserRiskLevels                           = @();
        }
    }
}

M365TenantConfig -ConfigurationData .\ConfigurationData.psd1
Using your PowerShell console, browse to the location where the .ps1 file is and execute it as if it was any other PowerShell script out there. This is what we call compiling a DSC configuration file. If successful, you should see an output similar to the screen below, which states that the file was successfully compiled into a

All that is left is for us to start the configuration deployment by running the following PowerShell command:
Start-DSCConfiguration M365TenantConfig -Wait -Verbose -Force

Once the execution successfully completes (no error thrown), you may want to navigate to the Azure portal to confirm that the policy was created as expected.

Step 9 - Monitoring for Configuration Drifts⚓
By default, once you've deployed a configuration file as shown in Step 8 above, the monitoring service is started by default and all drifts will be reported in the Event Viewer. In our case, we will go via the Azure portal, and force a configuration drift. In my case, I will go and disaable the policy (instead of having it in Report Only mode).
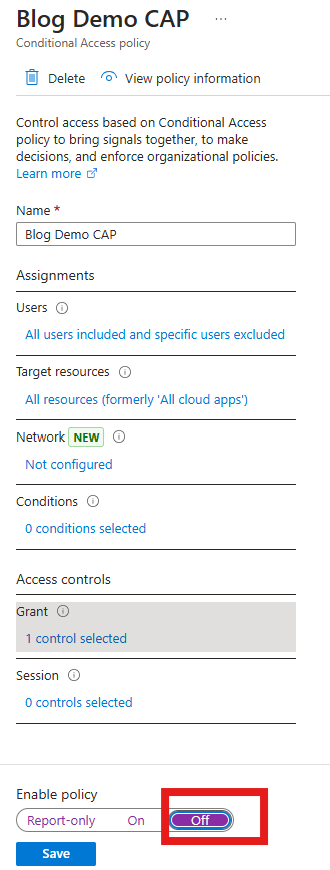
The monitoring service, by default, runs every 15 minutes. Because we do not want to wait for this to get automatically triggered, we will run the followin gPowerShell command to manually trigger it:
Test-DSCConfiguration -Detailed

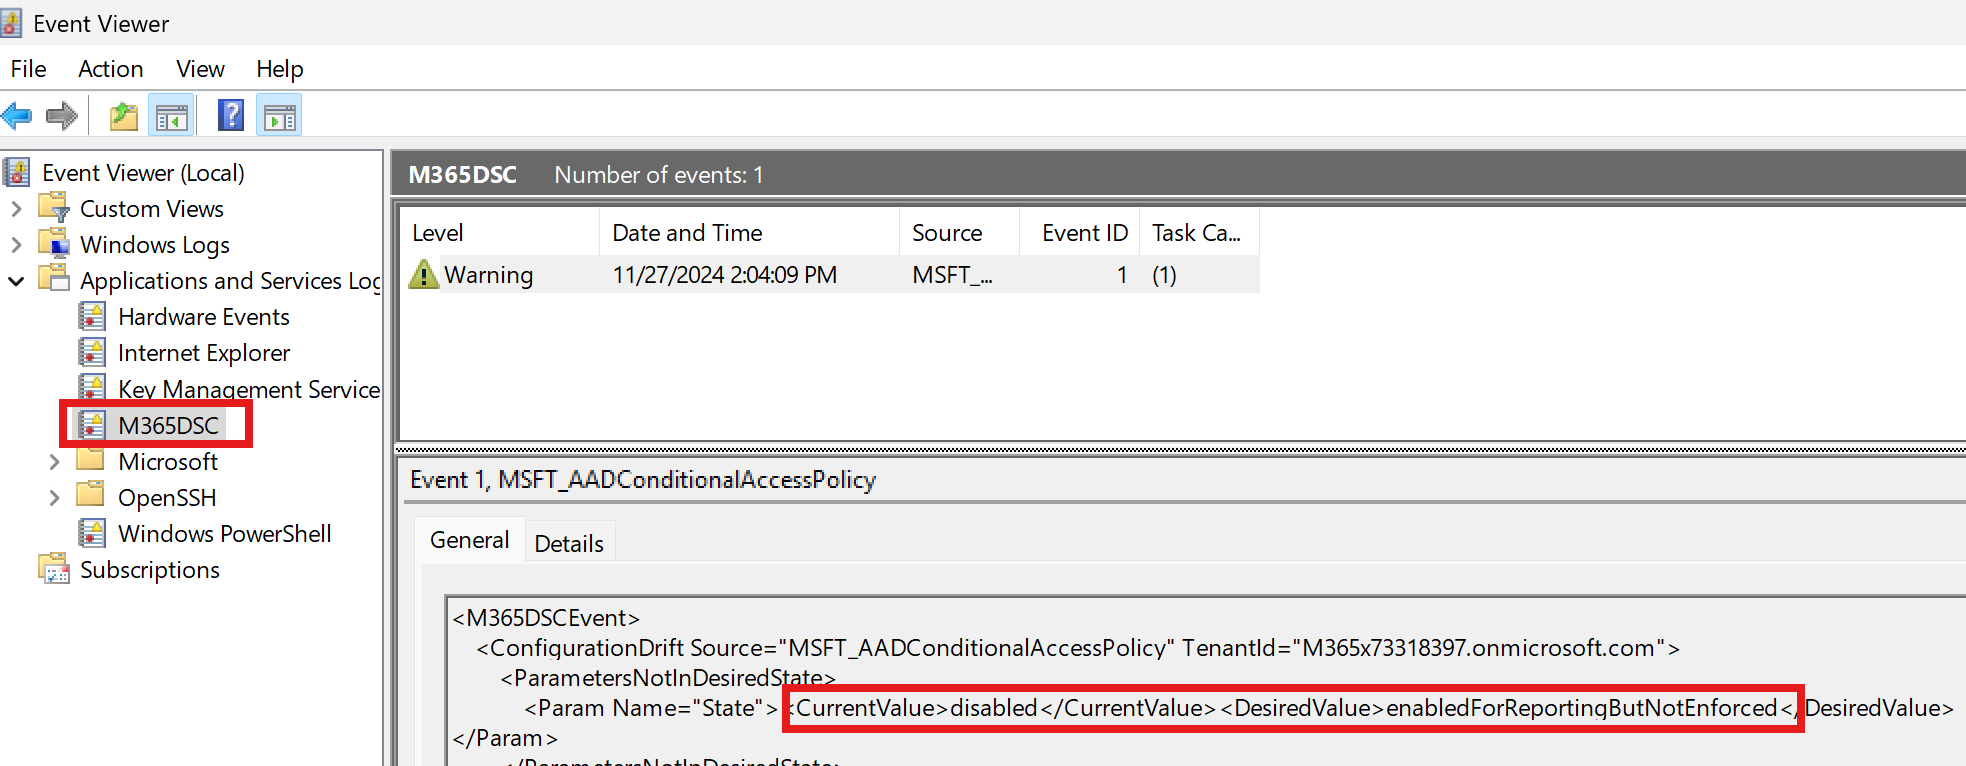
This will analyze the current state of our tenant against what has been defined in our desired configuration file in Step 8 above and will return the list of resources that are both in the desired state and not in the desired state. In our case, we only have 1 resource defined and we know it is not in the desired state because we just manually forced a drift. Note that to speed up the analysis process, you can omit the -Detailed switch which will cause the command to simply return true or false. To get additional details about the drift, we can open Event Viewer and look at Applications and Services Logs > M365DSC. There should be an entry in there that provides granular details about what our drift is.
Step 10 - Automatically Remediate to Configuration Drifts⚓
The last topic we will cover as part of this blog post, is the auto-remediation feature of PowerShell Desired State Configuration. By default, our LCM service is set in ApplyAndMonitor mode.
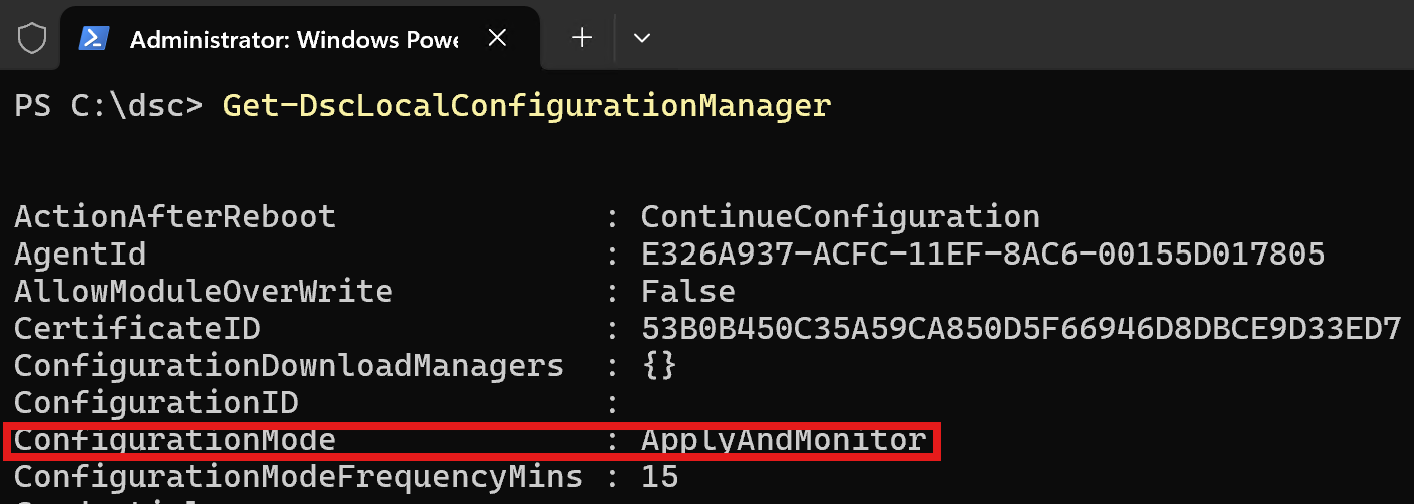
This means that when drifts are detected, the service will only report them in the Event Viewer and won't attempt to automatically remediate to them. To change this setting and set the LCM into ApplyAndAutocorrect mode, we need to eat our own dog food and use DSC to appy the configuration. This can be achieved by creating, compiling and applying a special configuration file known as a Meta MOF. To do so, simply execute the following lines of code:
[DSCLocalConfigurationManager()]
Configuration M365AgentConfig
{
    Node Localhost
    {
        Settings
        {
            COnfigurationMode = 'ApplyAndAutocorrect'
        }
    }
}
M365AgentConfig | Out-Null
Set-DSCLocalConfigurationManager M365AgentConfig -Force
To confirm that the change was successful, check the status of the LCM:
Get-DSCLocalConfigurationManager

Once this is properly set, the LCM service will automatically fix any detected drift by re-applying the good known configuration for the instance the next time is executes, which in my case is every 15 minutes (ConfigurationModeFrequencyMins).